Continuous Data Ingestion with Snowpipe and Stream in Snowflake

Introduction
Snowflake data pipelines offer significant benefits to organisations by streamlining and automating data processing workflows. Snowflake pipelines revolutionise data management and empower organisations to derive valuable insights from their data assets in a more efficient and timely manner.
In this blog, we’ll explain how to create a Snowflake data pipeline to automate the manual processes involved in creating and managing ELT logic for transforming and improving continuous data loads.
Definitions
Snowpipe Snowpipe is a cloud-native, real-time data ingestion service provided by Snowflake. It allows you to load data into Snowflake tables automatically as new data arrives in your cloud storage (e.g., Amazon S3 or Azure Blob Storage).
Change Data Capture Change Data Capture CDC is a technique used to capture and propagate changes made to a database in real-time. CDC identifies and captures data changes, such as inserts, updates, and deletes, from a source system’s transaction log. It provides a reliable and efficient way to track data changes and replicate them to target systems.
Stream A stream data manipulation language (DML) changes made to a table, directory table, external table, or the underlying tables in a view (including secure views). The object for which changes are recorded is called the source object.
Architecture
The following diagram represents the architecture of the Snowflake data pipeline.
 Snowpipe Architect
Creating a Snowflake data pipeline
To establish uninterrupted data pipelines, we will leverage the following Snowflake features:
- Utilising an external stage on Amazon S3
- Employing SnowPipe, a feature within Snowflake
- Leveraging streams functionality
- Utilising tasks to enable continuous data pipelines
- Implementing stored procedures to support the uninterrupted flow of data.
Step 1: Create an IAM Role for Snowflake to access data in S3 bucket
Creating an IAM Role specifically for Snowflake to access the S3 bucket ensures secure, controlled, and auditable access to the data.
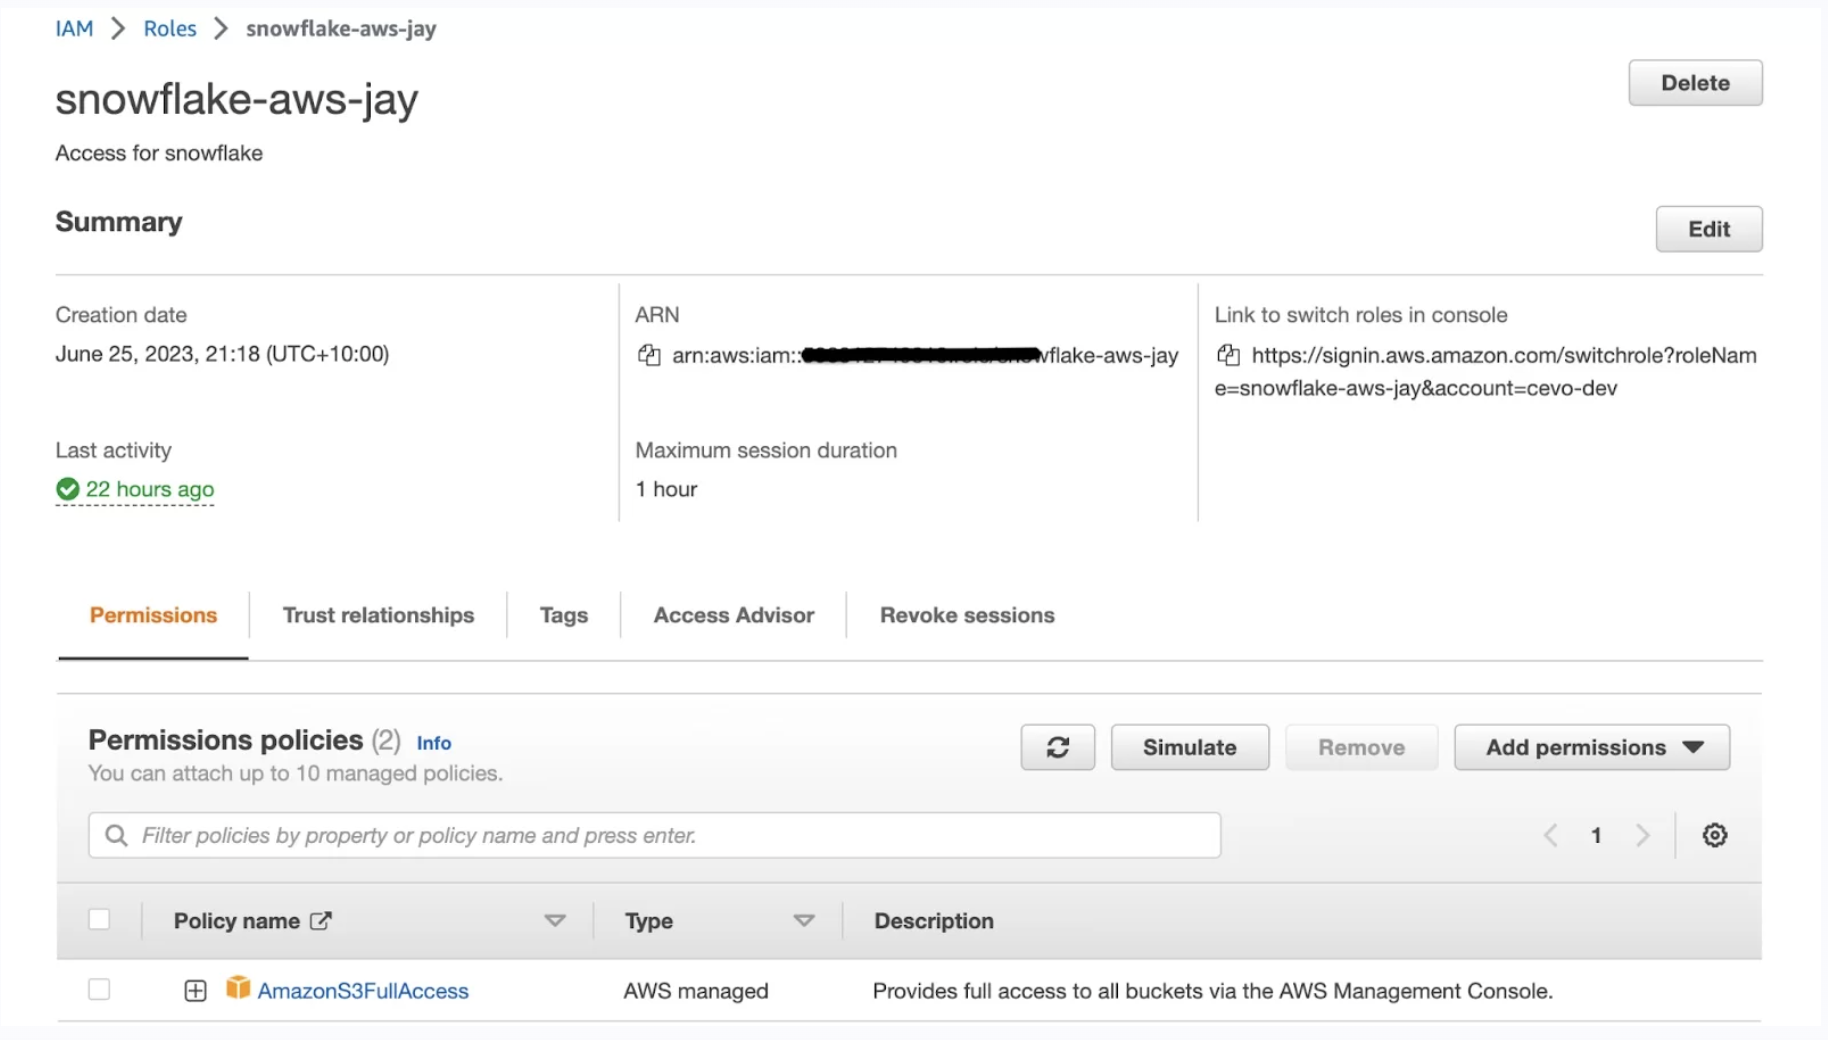 IAM Role
Step 2: Create an AWS S3 bucket and upload sample files.
This step involves setting up an external stage on Amazon S3, a storage service provided by Amazon Web Services. This stage serves as a destination for receiving input files that will be used in the data processing workflow. Once the input files are placed in the designated S3 bucket, Snowpipe, a specialised feature within Snowflake, is triggered. Snowpipe automatically detects new files added to the S3 bucket and initiates the subsequent steps in the data pipeline.
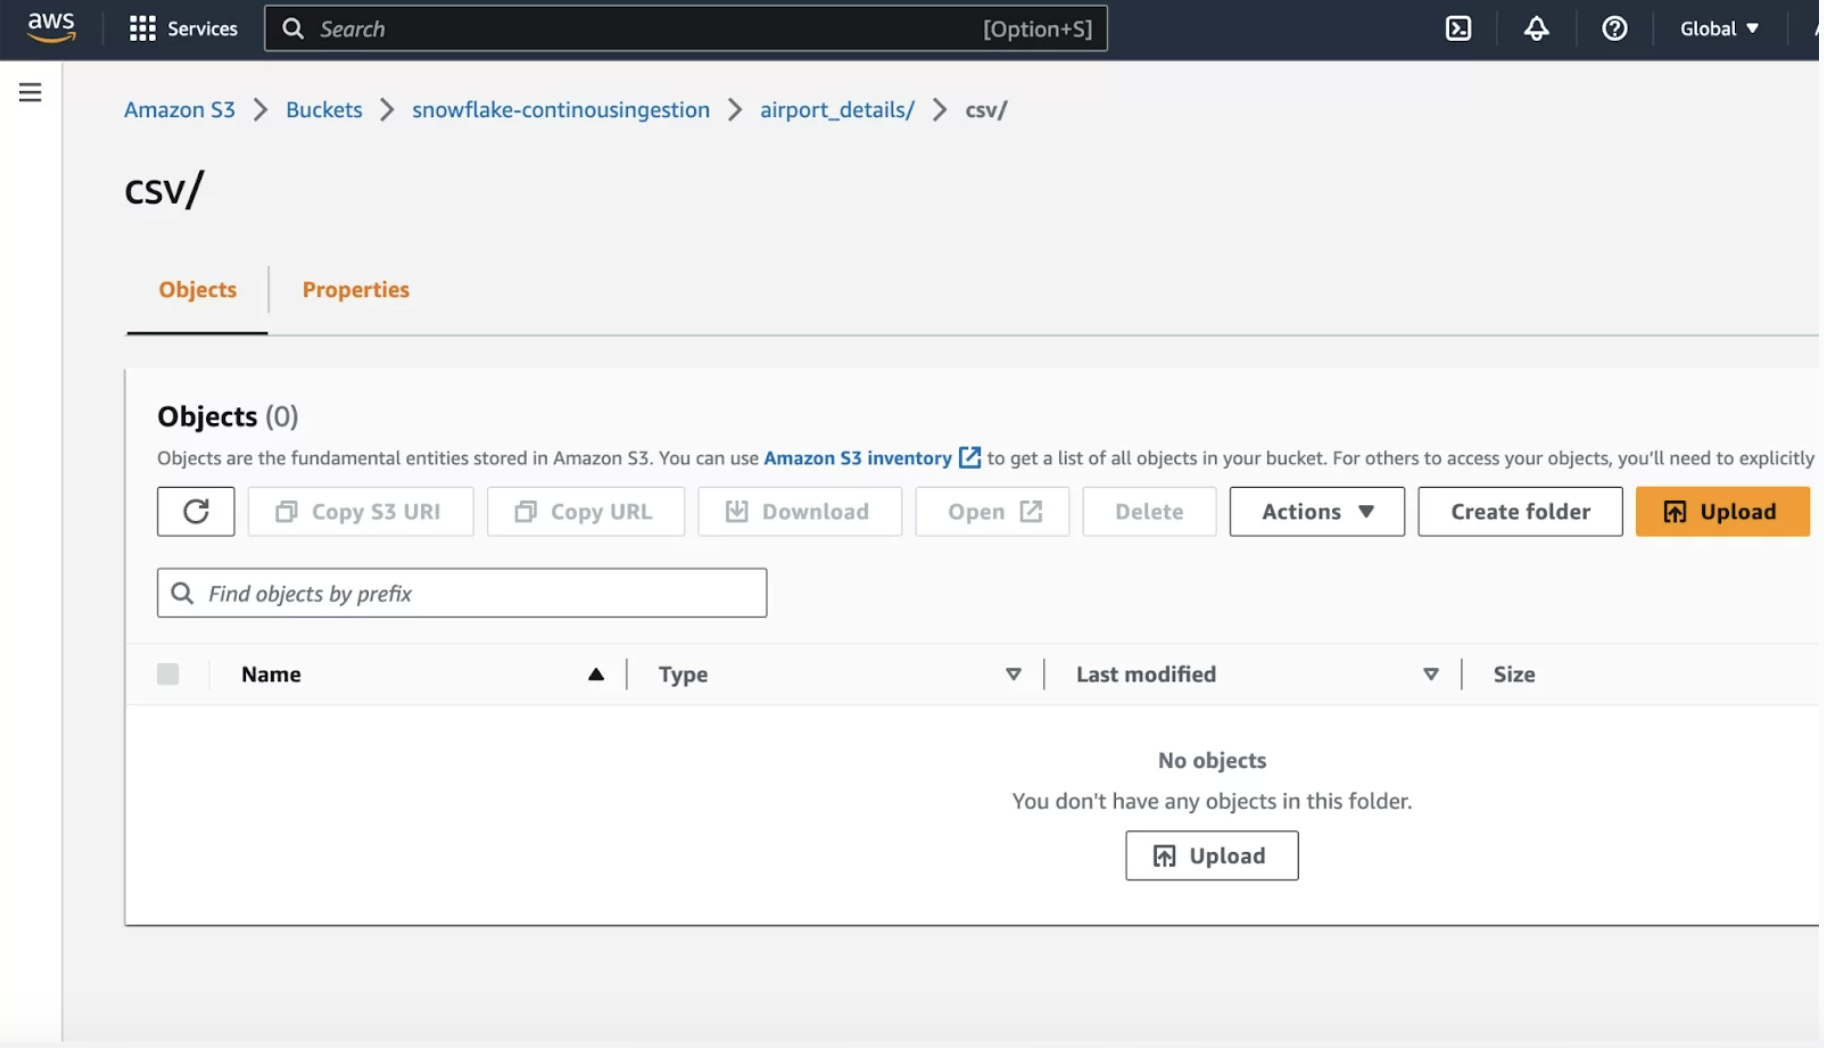 AWS S3 Bucket
Step 3: Create an integration object in Snowflake.
Storage integration is a Snowflake object that stores a generated identity and access management (IAM) entity for your external cloud storage, along with an optional set of allowed or blocked storage locations (Amazon S3, Google Cloud Storage, or Microsoft Azure).
CREATE STORAGE INTEGRATION aws_sf_data_load
  TYPE = EXTERNAL_STAGE
  STORAGE_PROVIDER = S3
  ENABLED = TRUE
  STORAGE_AWS_ROLE_ARN = 'arn:aws:iam::xxxxxxxxxxx:role/snowflake-aws-jay'
  STORAGE_ALLOWED_LOCATIONS = ('s3://snowflake-continousingestion/');
Snowflake’s External_ID and IAM User ARN are required to access AWS.
desc INTEGRATION aws_sf_data_load;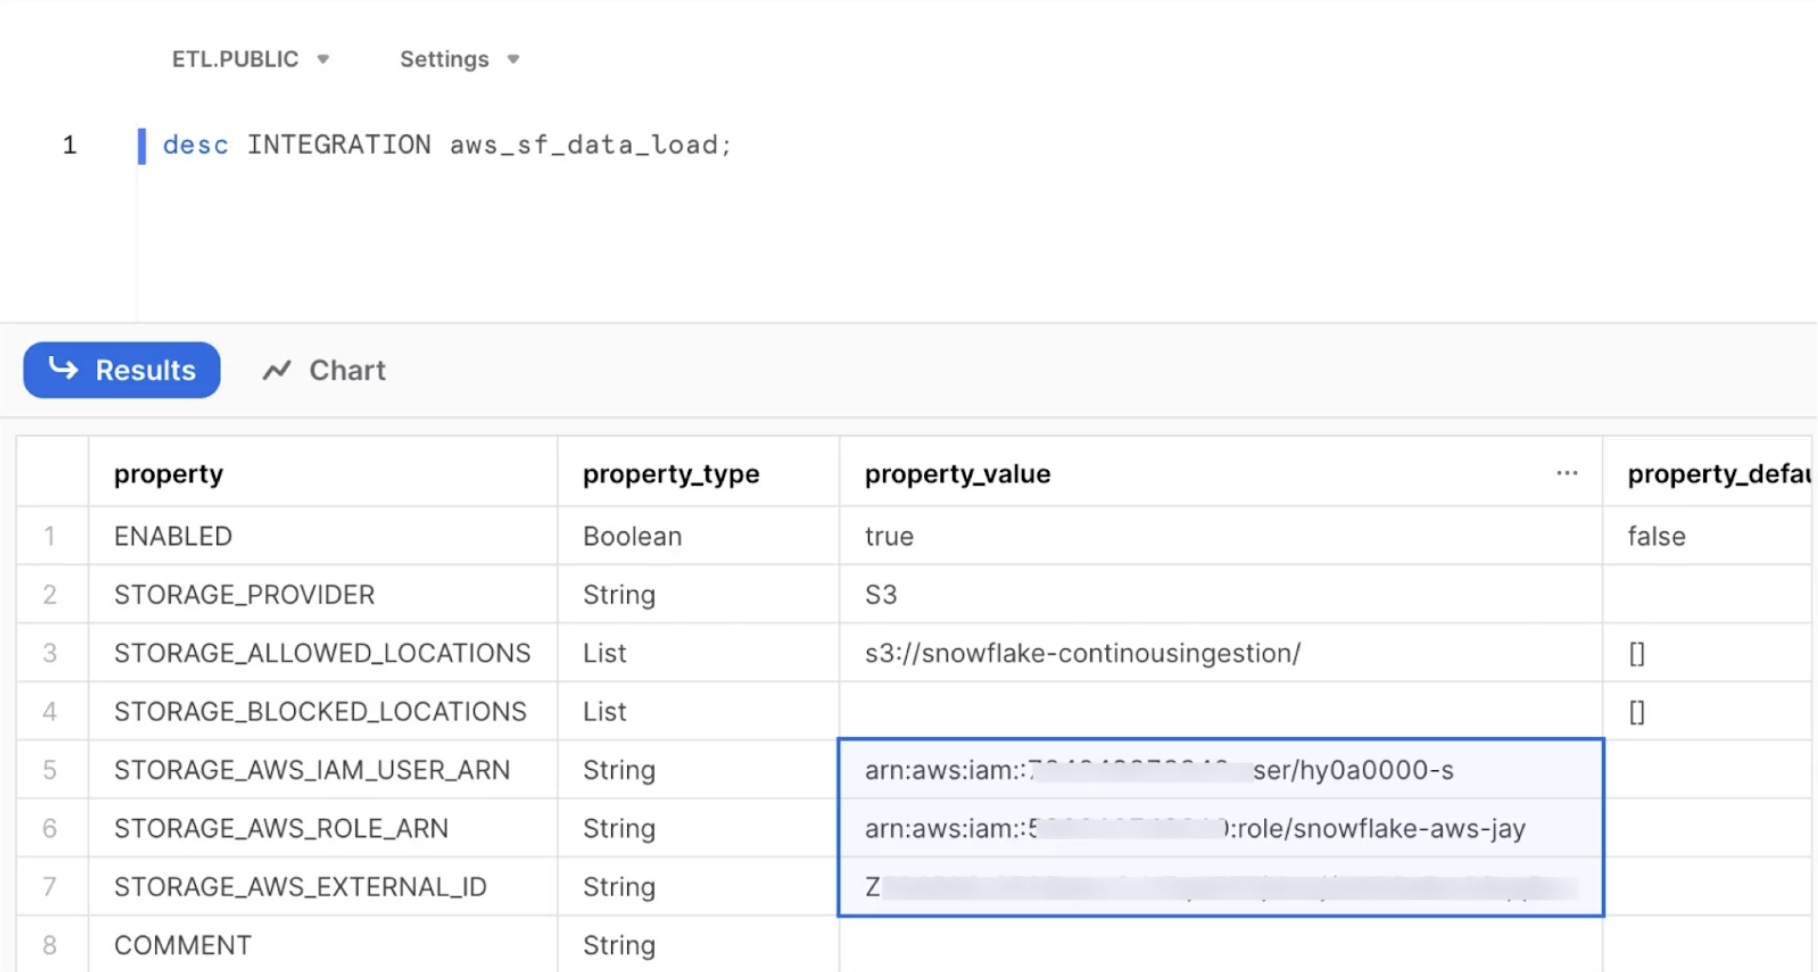 Description Table
Under ‘trust relationships’ within the IAM Role, add External_ID and IAM User ARN.
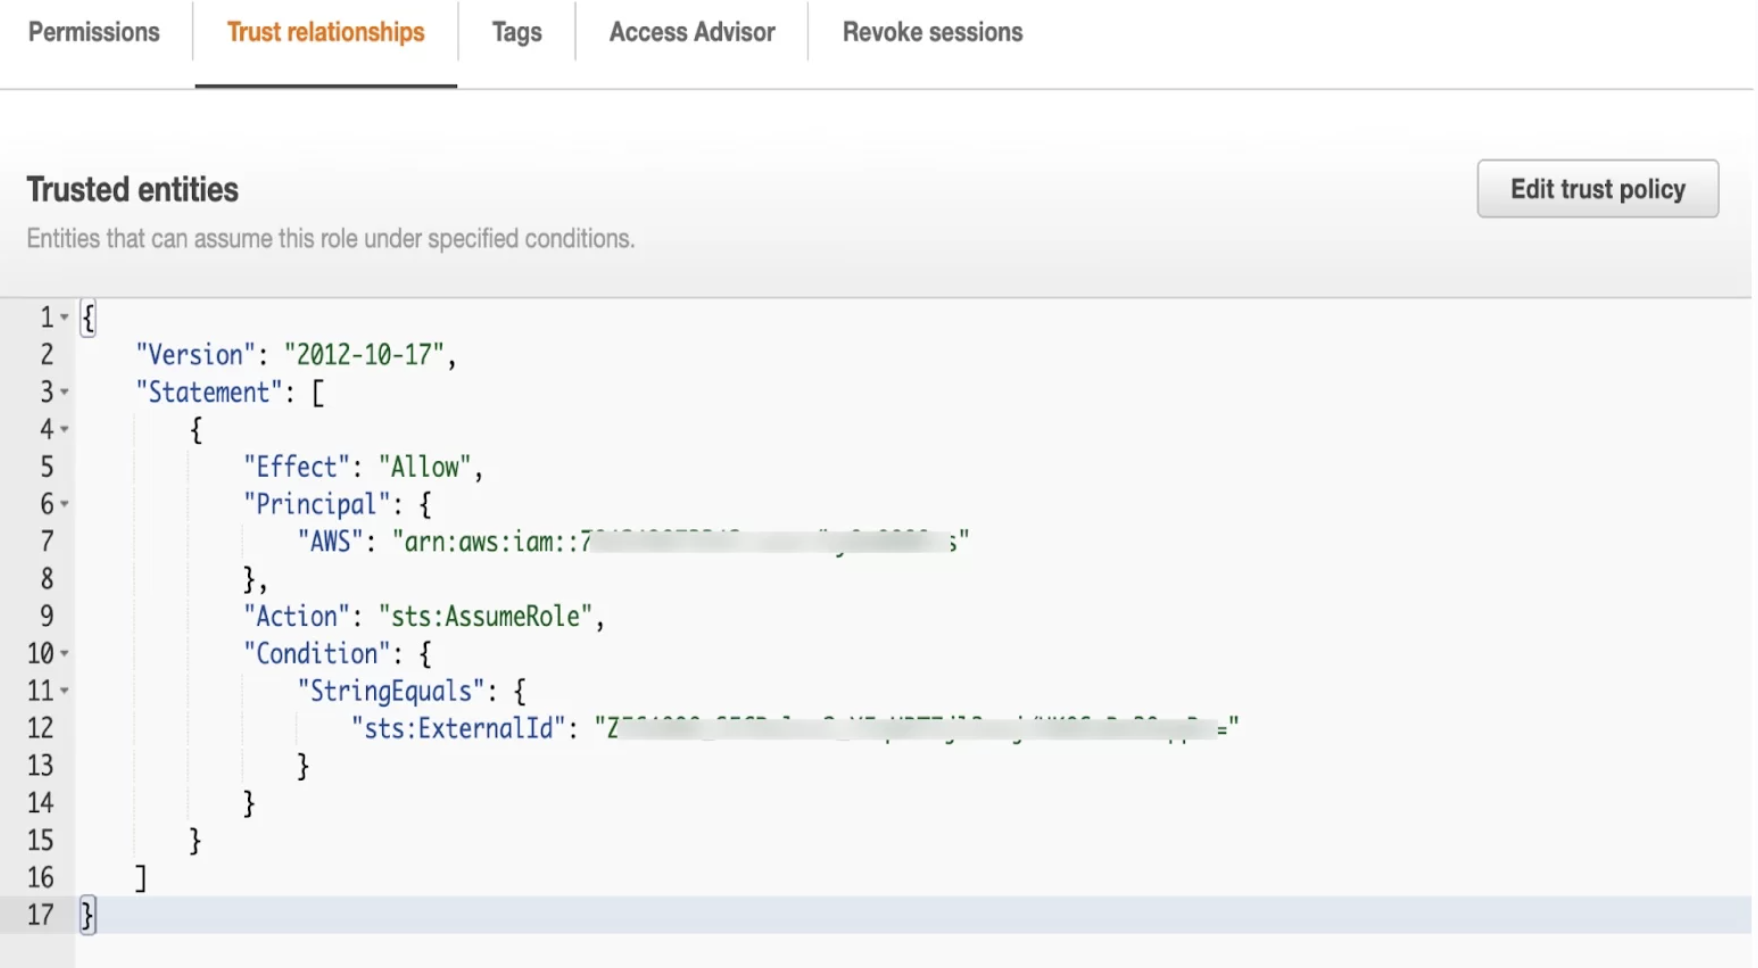 External_ID
Step 4:
In Snowflake, construct a file format object.
A file format is a configuration that specifies how data is organised and structured within files that are loaded into or exported from Snowflake tables.
CREATE FILE FORMAT csv_load_format
    TYPE = 'CSV'
    COMPRESSION = 'AUTO'
    FIELD_DELIMITER = ','
    RECORD_DELIMITER = '\n'
    SKIP_HEADER =1
    FIELD_OPTIONALLY_ENCLOSED_BY = '\042'
    TRIM_SPACE = FALSE
    ERROR_ON_COLUMN_COUNT_MISMATCH = TRUE
    ESCAPE = 'NONE'
    ESCAPE_UNENCLOSED_FIELD = '\134'
    DATE_FORMAT = 'AUTO'
    TIMESTAMP_FORMAT = 'AUTO';
Step 5: Create a stage object in Snowflake.
A stage specifies where data files are stored (i.e. “staged”) so that the data in the files can be loaded into a table. A named stage is a cloud storage location managed by Snowflake. Creating a named stage is useful if you want multiple users or processes to upload files.
CREATE stage stg_lairport_details_csv_dev
storage_integration = aws_sf_data_load
url = 's3://snowflake-continousingestion/airport_details/csv/'
file_format = csv_load_format;
Step 6: Create a Snowpipe.
We can now develop snowpipe to automatically ingest data from S3 to Snowflake because we have defined stage, table, and file format. The snowpipe will pick up and load a new file into the raw table whenever a new file is placed in the bucket.
create or replace pipe airport_details_pipe auto_ingest=true as
copy into airport_raw_details from @stg_airport_details_csv_dev ON_ERROR = continue;
Description Table
Subscribe the Snowflake SQS Queue in s3:. To do this:
- Log in to AWS Console
- Click on properties
- Click on create event notification
- Type event name (prefix and suffix are optional)
- Select all object create events
- Select SQS queue in destination → Select “enter SQS queue ARN” in the Specify SQS queue
- Paste the ARN(notification_channel) copied from Snowflake in the SQS queue box
- Save changes
 Event Notification
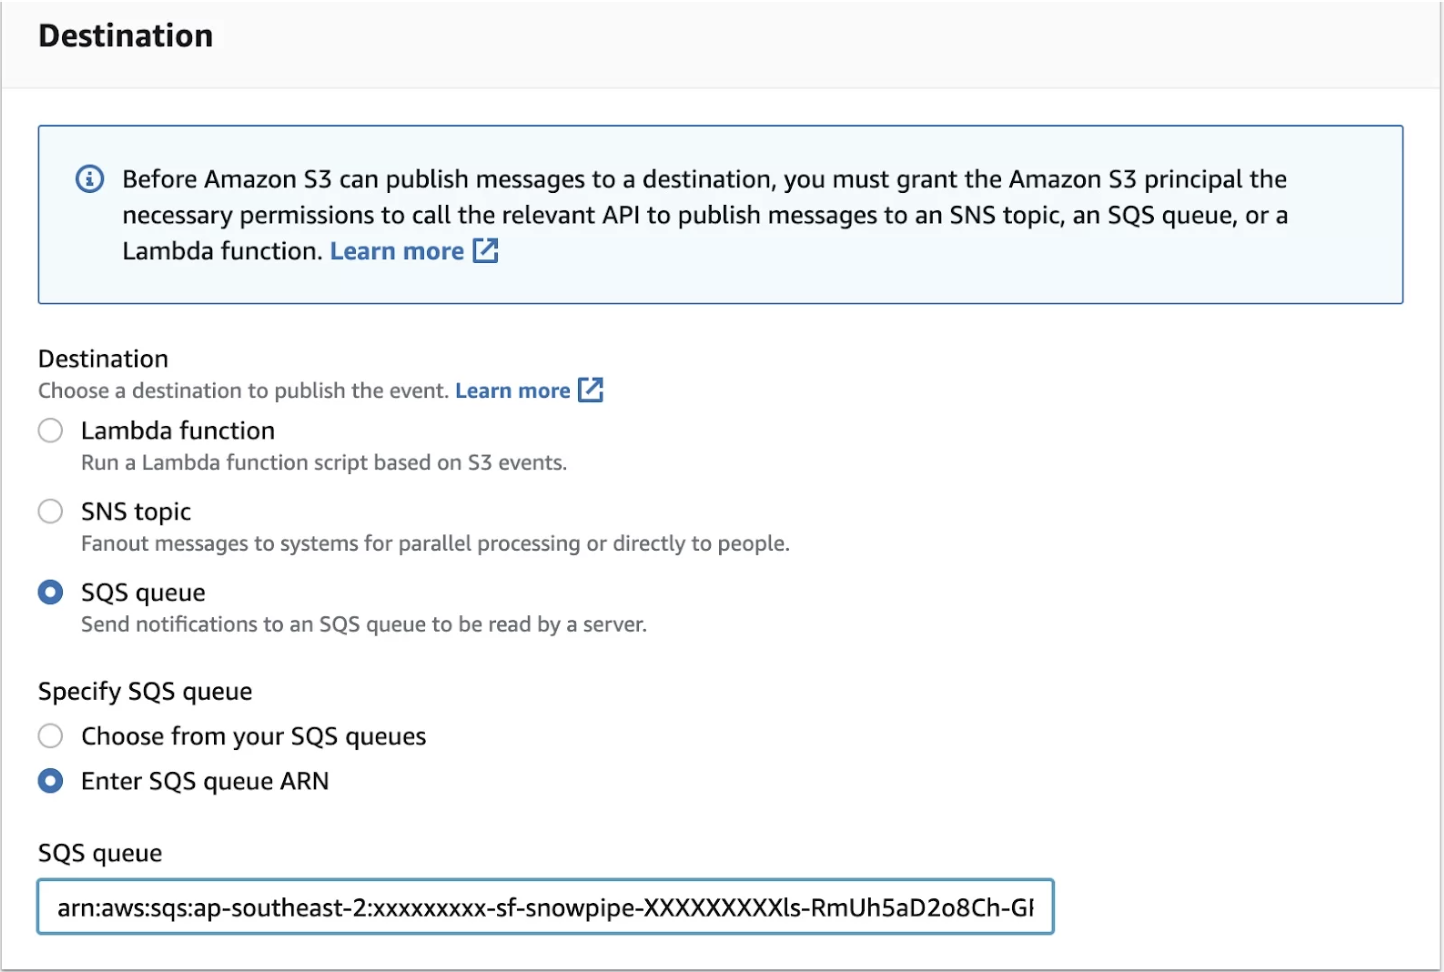 Destinations
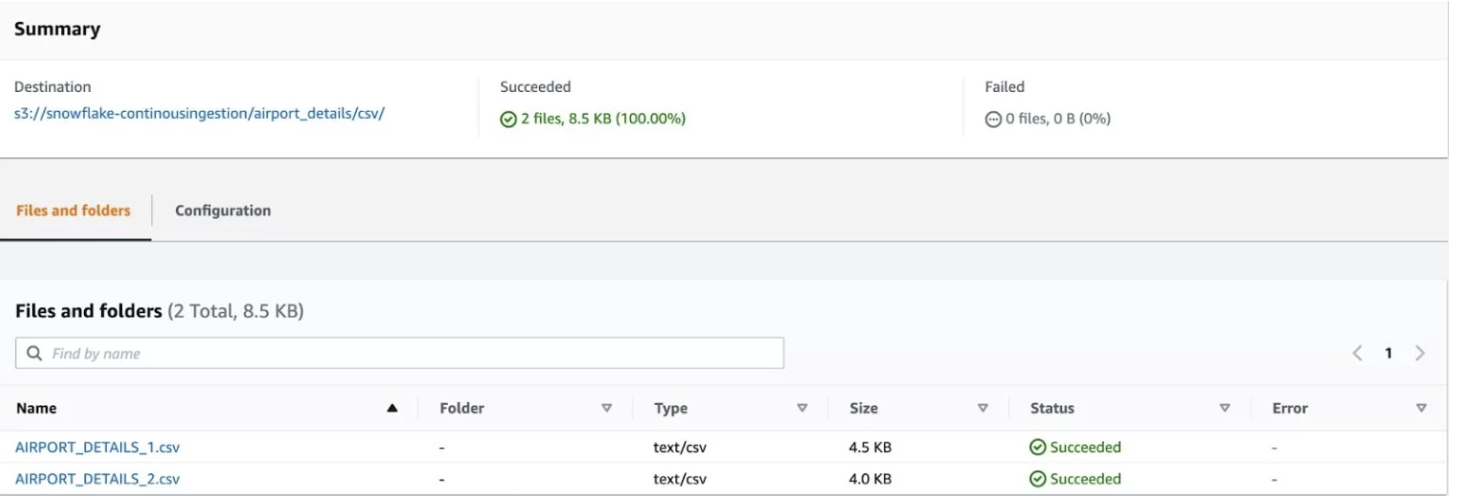 Summary
Step 7: Create a stream on the raw table.
CREATE OR REPLACE STREAM airport_std_stream ON TABLE airport_raw_details;For any new DML operations performed in the table, the changes will be captured in the stream table as below.
select * from airport_std_stream;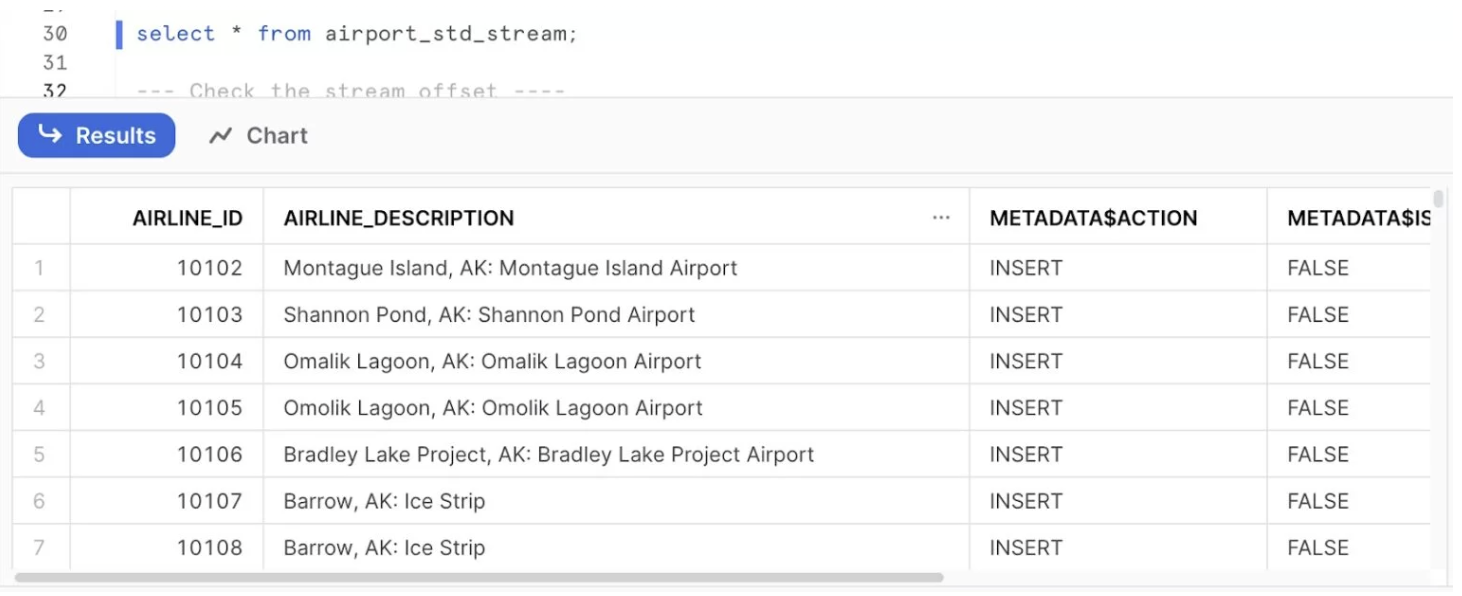 Table Result
Step 8:Create a task.
In Snowflake, a task is a feature that enables the automation of various actions and processes within the Snowflake data warehouse. It allows you to schedule and execute a series of SQL statements or stored procedures as a single unit.
create or replace task airport_load_tsk
warehouse = compute_wh
schedule = '1 minute'
when system$stream_has_data('airport_std_stream')
as
merge into airport_prod_details as li
using
(
   select
        AIRLINE_ID,
        AIRLINE_DESCRIPTION

    from
        airport_std_stream
    where metadata$action='INSERT'
) as li_stg
on li.AIRLINE_ID = li_stg.AIRLINE_ID
when matched then update
set
    li.AIRLINE_ID = li_stg.AIRLINE_ID,
    li.AIRLINE_DESCRIPTION = li_stg.AIRLINE_DESCRIPTION
when not matched then insert
(
    AIRLINE_ID,
    AIRLINE_DESCRIPTION
)
values
(
    li_stg.AIRLINE_ID,
    li_stg.AIRLINE_DESCRIPTION
);
Making use of the altered data captured in streams, you can create tasks to execute SQL queries or procedures. In accordance with a timetable for running SQL statements, including those that invoke stored procedures, you can schedule tasks to execute repeatedly.
Instead of always using the entire source table, we may utilise the TASK’s MERGE statement to MERGE only the changes (streams) from the source table to the target table.
ALTER TASK airport_load_tsk RESUME;

EXECUTE TASK airport_load_tsk
Next, validate the result.Once Streams capture any data change on the source table(AIRPORT_RAW_DETAILS). So all the new data added to the Target table AIRPORT_PROD_DETAILS.
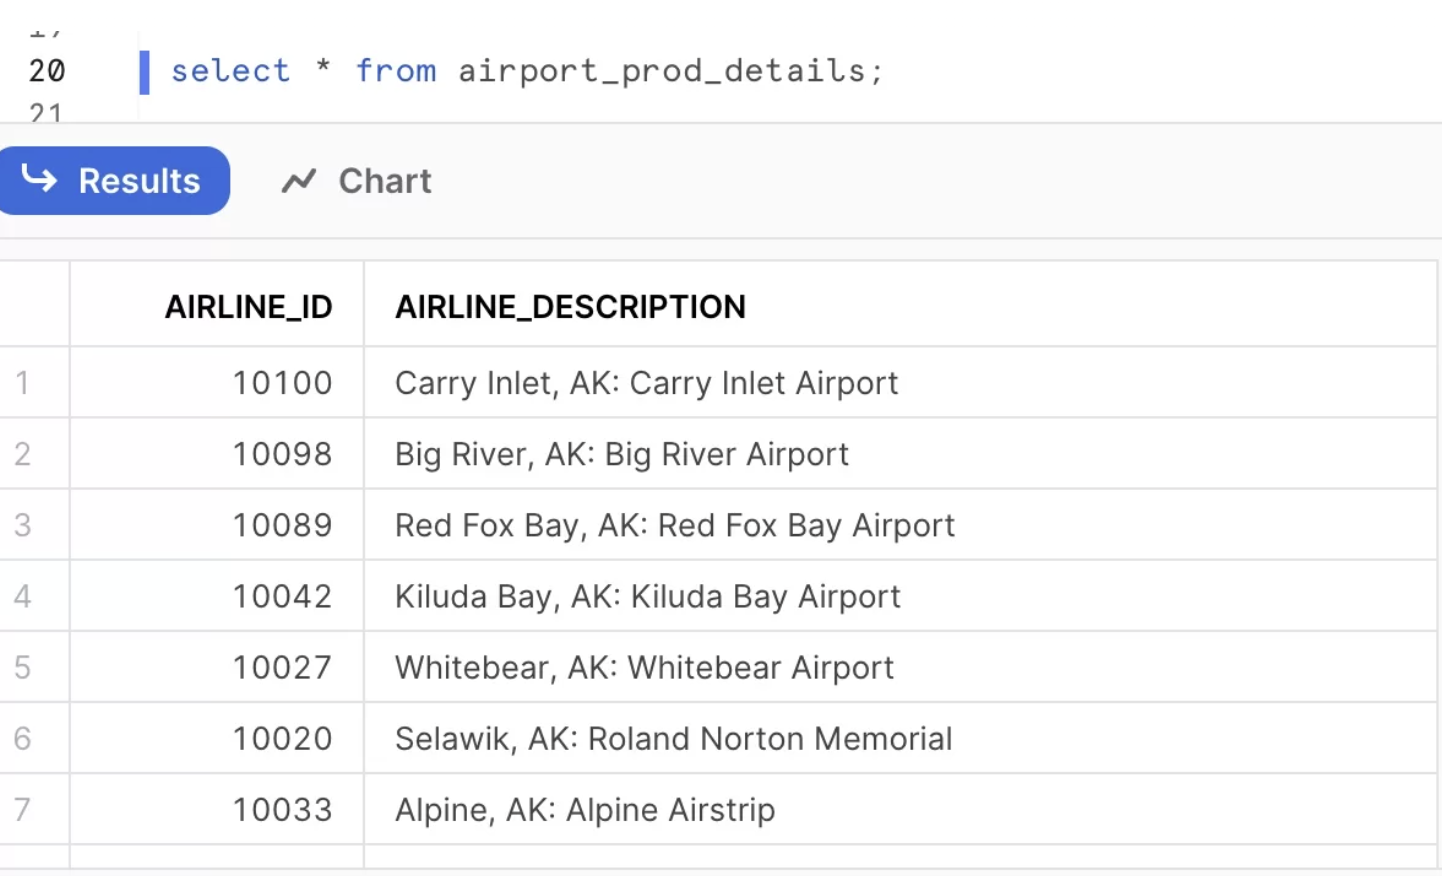 Prod Details
Conclusion
In this post, we have discussed how to create the Snowflake data pipeline. By implementing Snowflake data pipelines, organisations can unlock the full potential of their data assets, enabling efficient and automated data processing, real-time insights, improved data quality, cost optimisation, and enhanced data governance. These benefits contribute to informed decision-making, improved operational efficiency, and a competitive advantage in the data-driven business landscape.
Note: This article was originally published on Cevo Australia’s website
If you enjoy the article, Please Subscribe.